


Understanding Embroidery Stabilizers: Tips for Flawless Stitching Results
Ever had your embroidery design shift, pucker, or just not look as sharp as it should? Youre not aloneand the culprit is often the stabilizer (or lack of the right one).
Embroidery stabilizers are the unsung heroes behind every professional stitch-out. They hold your fabric in place during embroidery and prevent stretching, shifting, or distortion. If youre new to machine embroidery, getting to understanding embroidery stabilizers will seriously level up your results.
Want your artwork professionally digitized for any stabilizer and fabric type? Try Digitizing Buddythey tailor your designs density and underlay specifically for your stabilizer setup and machine type!
Lets dive in and break down everything you need to know about stabilizers, plus tips for choosing the perfect one for any project.
What Is an Embroidery Stabilizer?
A stabilizer is a material that you place under, over, or around your fabric during embroidery to:
- Keep it from stretching or shifting
- Maintain design accuracy
- Prevent puckering and distortion
- Support stitches, especially on thin or stretchy fabrics
It acts like a foundation for your stitches, ensuring they land where theyre supposed to.
Why Stabilizers Matter
You can have the best design, thread, and machine but if your stabilizer doesnt match your fabric or design, the final stitch-out can be a mess.
Wrong stabilizer =
- Gaps in stitches
- Crooked text or logos
- Puckered fabric
- Thread breaks
Right stabilizer =
- Crisp, clean, professional embroidery
- Accurate stitch placement
- Stable, smooth resultseven on stretchy fabric
Main Types of Embroidery Stabilizers
There are three main categories of stabilizers. Each serves a different purpose depending on your fabric type, design complexity, and project goal.
Tear-Away Stabilizer
Best for: Stable, woven fabrics like denim, canvas, cotton, or twill.
Features:
- Rips away cleanly after stitching
- Fast and easy to remove
- Great for simple or low-density designs
Pros:
- Quick cleanup
- Inexpensive
- Beginner-friendly
Cons:
-
Doesnt work well on stretchy or delicate fabric
Pro Tip: Use medium-weight tear-away for hats, patches, or logo embroidery on polos.
Cut-Away Stabilizer
Best for: Stretchy or delicate fabrics like knits, t-shirts, or athletic wear.
Features:
- Stays permanently behind the design
- Offers the most support
- Ideal for high-stitch-count or dense designs
Pros:
- Super stable
- Prevents distortion on stretchy fabrics
- Long-lasting for garments
Cons:
-
Requires trimming
Pro Tip: Use no-show mesh cut-away on lightweight shirtsit gives invisible support without the bulk.
Wash-Away Stabilizer
Best for: Sheer fabrics, lace, freestanding embroidery, or projects where stabilizer must disappear.
Features:
- Dissolves completely in water
- Leaves no trace
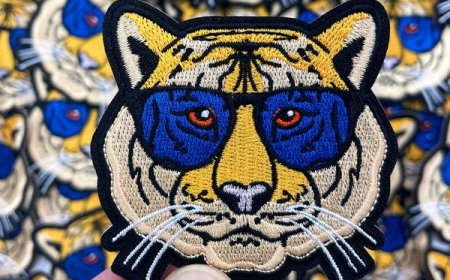
- Perfect for 3D or standalone designs (like patches or appliqu)
Pros:
- Leaves fabric completely clean
- Great for delicate fabrics
- Perfect for heirloom or visible-back projects
Cons:
-
Not suitable for all fabrics
Pro Tip: Use wash-away as a topping when embroidering on towels or fleece to prevent stitches from sinking into the nap.
Bonus: Heat-Away Stabilizer
Used for: Fabrics that cant be washed (like silk or velvet)
How it works:
-
It disappears with heat from an iron instead of water.
Mostly used as a topping on specialty fabrics.
What About Toppings?
A topping is a stabilizer placed on top of the fabric to stop stitches from sinking into the texture.
Use toppings when stitching on:
- Towels
- Fleece
- Velvet
- Stretchy knits
Water-soluble topping (like Solvy) is the most popular and washes away easily.
Choosing the Right Stabilizer for Your Fabric
|
Fabric Type |
Best Stabilizer |
|
Cotton |
Tear-away or light cut-away |
|
T-shirts / Jersey |
Soft cut-away or no-show mesh |
|
Towels |
Tear-away + water-soluble topping |
|
Fleece |
Cut-away + topping |
|
Denim |
Medium tear-away |
|
Satin / Silk |
Heat-away or wash-away |
|
Stretchy fabrics |
Cut-away (no exceptions) |
|
Sheer / Lace |
Wash-away only |
Remember: The more stretch or texture a fabric has, the stronger your stabilizer needs to be.
FAQs About Embroidery Stabilizers
Can I skip stabilizer for small designs?
Its risky. Even tiny designs need support. Use at least a lightweight tear-away.
How do I hoop fabric with stabilizer?
- Place stabilizer under fabric
- Hoop both tightly, avoiding wrinkles
- Use a spray adhesive or pin if needed
Whats the best stabilizer for hats?
Most pros use medium to heavy tear-away, especially on structured caps. Some add cap backing for extra stiffness.
What stabilizer works for freestanding lace?
Wash-away stabilizer only. It dissolves after stitching and leaves only the lace behind.
How many layers of stabilizer should I use?
One is usually enough for stable fabrics. For stretchy or dense designs, use:
- Two layers of tear-away
- One heavy cut-away with light topping
Stabilizer Tips for Flawless Results
Always test your fabric and stabilizer before stitching your final piece
Pre-wash your fabric (especially knits)
Match your stabilizer weight to your fabrics stretch and design density
Avoid hoop burnuse soft cut-away or float fabric when needed
Use temporary spray adhesive to hold stabilizer in place without wrinkles
Digitizing Tip: Match Design to Stabilizer
When digitizing your design (or getting it digitized), mention your fabric and stabilizer type. It helps the digitizer adjust:
- Underlay stitching
- Density
- Pull compensation
- Stitch type selection
Digitizing Buddy specializes in this! Theyll prepare a stitch file thats not only machine-compatible but stabilizer-optimized, so your fabric looks crisp and flawless after every run.
Final Thoughts: Stabilizers Make or Break Your Embroidery
Using the right stabilizer isnt optionalits essential for clean, professional-looking embroidery.
Heres a quick recap:
- Use tear-away for stable fabrics like denim and cotton
- Use cut-away for stretchy fabrics like knits and t-shirts
- Use wash-away for lace, freestanding designs, or when nothing should remain
- Add topping on textured surfaces like towels or fleece
Pair the right stabilizer with a properly digitized design, and your embroidery will go from meh to masterpiece.
Need help preparing your design for a specific stabilizer or fabric? Trust the pros at Digitizing Buddy to get it rightevery time.